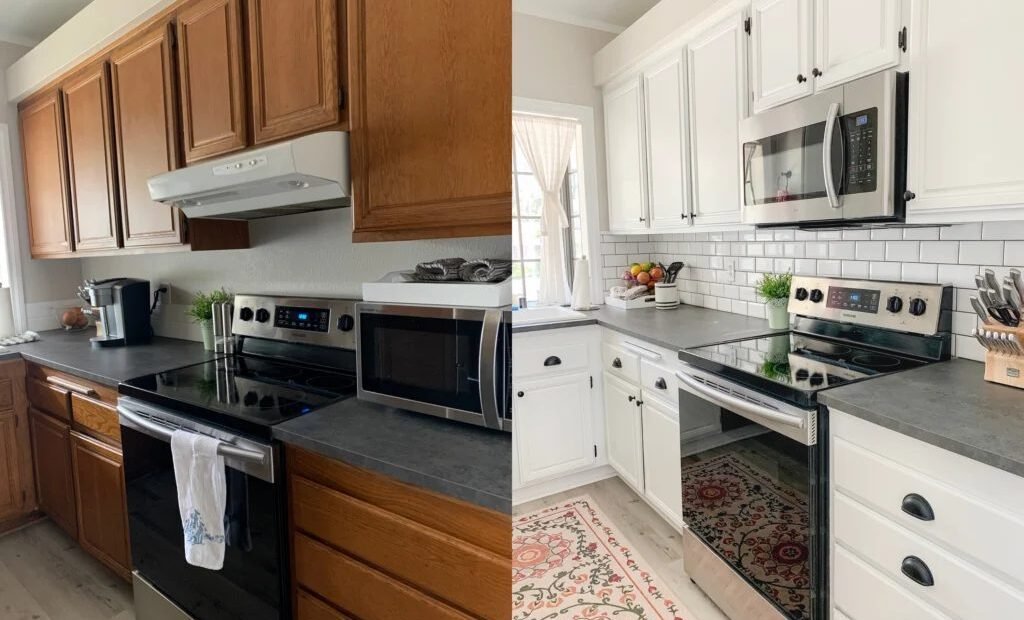
Most no-sand cabinet jobs do not fail while the painting is happening. They fail in the week after, when a greasy fingerprint, a bump from a pot lid or a fingernail at a drawer edge lifts the new finish off in a grey little sheet — and the owner concludes that skipping the sanding was the mistake. It usually was not. Sanding was never the point; adhesion was. A no-sand job stands or falls on degreasing, the right primer and respecting the cure, and it fails through a short list of predictable mistakes. Here they are, in the order they ruin kitchens.
Mistake 1: Painting over kitchen grease
Cabinets live in an aerosol of cooking oil. The film is invisible, it concentrates near the stove and on the undersides and tops of doors, and paint will not bond to it — it bonds to the grease, and the grease is bonded to nothing. This is the single most common cause of peeling cabinet paint, and no primer fixes it after the fact. The correction is tedious and total: scrub every surface to be painted with a degreaser or a TSP-substitute solution, working in sections, rinsing with clean water and changing the rinse water when it clouds. Fingertips are the test — a degreased surface squeaks slightly under a dragged fingertip and shows no rainbow sheen when wet. Budget more time for this step than for the first coat of paint. Kitchens that fry often may need two full passes. It is the least satisfying hour of the project and the one that decides it.
Mistake 2: Treating “no sanding” as “no prep at all”
The no-sand method replaces abrasion with chemistry, not with optimism. Glossy factory finishes and old varnish still need their shine knocked back so primer can grip; the substitute for sandpaper is a liquid deglosser (also sold as liquid sandpaper), wiped on and left to dull the surface per the label’s timing. Skipping both sanding and deglossing leaves primer sitting on a slick shell, and the finish chips at every knob and edge within months. Two honest exceptions where no-sand truly does not apply: cabinets with peeling or flaking existing paint, which must be scraped and sanded smooth at the transitions or the new finish telegraphs every ridge; and raw or stained wood in poor condition with raised grain or water damage, which needs real repair before any coating system. On sound, glossy cabinets — the usual case — deglosser plus bonding primer is a legitimate, durable system, not a shortcut.
Mistake 3: Using wall paint, or skipping the bonding primer
Two product choices decide durability. First, the primer must be a bonding primer — a shellac-based or dedicated high-adhesion formula made to grip slick surfaces; ordinary wall primer is formulated for drywall, not varnish, and it lets go. One coat, allowed to dry fully, is the foundation of the whole job. Second, the topcoat must be a cabinet and trim enamel — alkyd, urethane-alkyd or acrylic-alkyd formulas sold specifically for cabinets — which dries harder and levels smoother than wall paint. Benjamin Moore’s cabinet paint and primer range is one example of the category; every major maker has an equivalent line, and the shared trait is a finish that resists blocking (doors sticking to frames) and stands up to hand oils and cleaning. Two thin topcoats beat one thick one. Applied this way, materials for an average kitchen run $100 to $200 — set against $3,000 to $6,000 for professional cabinet painting or $15,000 and up for replacement, the arithmetic explains the method’s popularity, but only when the products are right.
Mistake 4: Brushing everything and fighting the brush marks
Cabinet doors are flat, wide and viewed at raking angles in kitchen light; every brush stroke shows. The fix is technique, not talent. Lay doors flat, removed, on sawhorses — painting a door vertically invites runs and makes the underside a drip catcher. Use a high-density foam roller or a short-nap mini-roller for the flat fields and a quality angled brush only for the profiled edges, then tip off lightly. For a factory-smooth result, an HVLP sprayer around the $100 mark is the upgrade that changes the finish category entirely; it demands more masking and practice on cardboard first, but it eliminates texture. Whichever tool you choose, keep a wet edge, do not re-brush paint that has started to tack, and accept that dust control — a wiped-down room, a tack cloth before each coat — matters as much as the tool.
Mistake 5: Leaving the hardware and doors in place
No-sand refers to the finish, not to the disassembly, and the painters who try to cut around hinges, knobs and mounted doors produce the visible evidence: paint ridges around hardware, coated hinge leaves that crack the first time a door swings, and interiors of cabinets never properly degreased because the doors blocked the way. The correct project starts with an hour of unglamorous removal. Take every door and drawer front off, pull every knob and hinge, and label each piece and its hardware in a taped bag — painter’s tape on the inside of the door, matching numbers on frame and front. Cabinets are rarely symmetrical enough for parts to be interchangeable, and a labeling system invented at reassembly time is a puzzle you did not need. With the fronts off, the work moves to sawhorses, the frames get fully cleaned rather than reached around, and the finished kitchen reassembles like a kit. This is also the moment to fill old knob holes if the new hardware’s spacing differs — a five-minute wood-filler job now or a visible plugged hole forever.
Mistake 6: Misreading the two-weekend schedule
The project is sold as two weekends, and it is — but only if the weekends are assigned correctly. Weekend one is removal, degreasing, deglossing and primer, in that order, and it ends with primed surfaces curing, not with color. Rushing primer and topcoat into the same day compresses the exact drying windows the system depends on, and a bonding primer sanded or coated before its stated dry time loses the grip it was bought for. Weekend two is the two enamel coats with their full recoat interval, the rehang with bumpers, and the start of the cure. Between and after comes the patience already described: the painted fronts cure best lying flat, undisturbed, in a dust-light room. Households that need the kitchen running throughout can do the project in halves — uppers first, lowers the following week — accepting a longer calendar in exchange for never losing the whole room. What does not work is shrinking the chemistry to fit the calendar; the paint keeps its own schedule regardless of yours.
After it cures: keeping it looking painted-on-purpose
A cured cabinet finish is maintained like the factory finish it imitates. Clean with a soft cloth and mild soap solution; solvent cleaners and scouring pads dull and eventually breach the enamel. Felt bumpers, replaced when they fall off, keep door-to-frame contacts from wearing through to primer at the same two points for a decade. Keep a labeled jar of the topcoat — color name and sheen on the lid — because chips in year three are a two-minute touch-up when the paint is at hand and a color-matching expedition when it is not. Steam deserves one specific mention: a kettle parked permanently beneath an upper cabinet will spend years blasting the finish with vapor, and on a young cure it can blister fresh enamel in a single season. Move the kettle out from under the uppers, or pull it forward on the counter when it runs. And note the honest limit of the whole method: it redeems sound cabinets. Warped doors, failing particleboard swollen by sink leaks and broken joinery are carpentry problems wearing a paint question’s clothes, and no coating system, sanded or not, answers them.
Mistake 7: Using the kitchen during the cure
Cabinet enamel feels dry in hours. It is not cured. Full hardness takes two to four weeks depending on the product, and during that window the finish is a hard shell over a soft core: doors closed hard against frames stick and peel at the contact points, stacked items leave prints, and a slammed pot chips what would have shrugged off the same blow a month later. The correct finish to the project is behavioral: rehang doors with small felt or silicone bumpers so no painted surface touches another, handle knobs by their edges, keep harsh cleaners off for the full cure period, and warn the household that the kitchen is in a gentle-use phase. Done this way — degreased, deglossed, bonding-primed, enameled and allowed to cure — a no-sand cabinet job realistically lasts five to ten years. It is also the anchor project of the cheapest way to update an old kitchen, because nothing else changes the room as completely for the price of two weekends and under $200 in materials. Skip a step, and the same project becomes the story about why you should have sanded — when sanding was never the step that mattered.