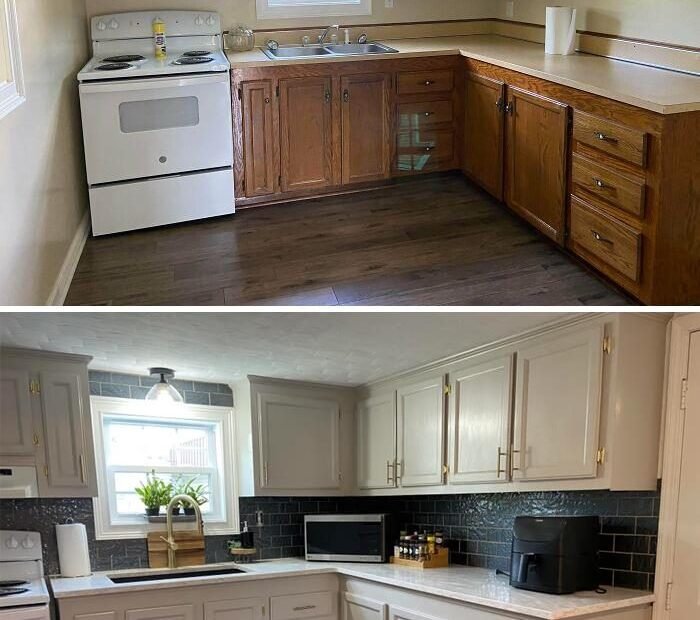
Our kitchen had oak cabinets from 1994, brass hardware, and a countertop that had seen things. A full remodel quote came in at $32,000. We updated it for $900, and visitors now ask who our contractor was. The contractor was us, plus a paintbrush and a weekend.
The cheapest way to update an old kitchen is not one trick. It is a stack of cheap tricks that compound: paint, hardware, lighting, and decluttering, in that order of impact per dollar.
What Is the Cheapest Way to Update an Old Kitchen?
Start with the cabinets, because they are 70% of what your eye sees. Painting kitchen cabinets with a quality bonding primer and cabinet-grade paint transforms the room for $100 to $200 in materials. The keys are degreasing thoroughly (kitchen cabinets are coated in invisible grease), using a bonding primer, and applying thin coats with a foam roller or sprayer. White, warm white, or soft sage green are the safe bets; two-tone with a darker island color looks custom. This single project delivers 80% of a remodel’s visual impact at 3% of the cost.
Next, the hardware swap. What is the cheapest way to update an old kitchen after paint? New cabinet pulls and knobs, $2 to $5 each, maybe $100 total for an average kitchen. Brushed brass or matte black instantly modernizes 90s oak. While you are at it, replace the faucet if yours is dated; a $80 to $150 pull-down faucet from a big-box store installs in an hour and feels like luxury every single day.
- Paint the cabinets. Bonding primer plus cabinet paint, $100-$200. The highest-impact cheap upgrade in the home.
- Swap all hardware. Knobs and pulls in a modern finish, ~$100. Measure the existing hole spacing before buying.
- Upgrade the lighting. Under-cabinet LED strips ($30-$60) make countertops glow and the kitchen feel expensive. Swap dated fixtures for simple modern ones.
- Refresh the backsplash cheaply. Peel-and-stick tile ($50-$150) looks shockingly good now, or paint existing tile with tile-specific paint.
- Replace the faucet. $80-$150, one hour, daily luxury. The most-used object in the kitchen deserves better.
- Declutter ruthlessly. Clear counters to three beautiful, useful items. Free, and it makes every other upgrade look twice as good.
- Update outlet covers and switch plates. $20 total. The detail nobody notices consciously but everyone feels.
- Paint the walls a fresh neutral. One gallon, one afternoon, and the old color that was dating the room is gone.
What not to do on a budget: do not replace appliances piecemeal unless one dies (mismatched new appliances look worse than matched old ones), do not install cheap laminate over decent counters (paint the cabinets instead and save for real counters later), and do not start moving plumbing or walls. The moment you touch layout, you have left budget territory.
The $900 Kitchen: A Real Breakdown
Here is where our $900 went: cabinet paint and primer $160, new pulls and knobs $110, faucet $120, under-cabinet LEDs $45, peel-and-stick backsplash $90, wall paint $45, new switch plates $20, and about $300 in tools and supplies we now own forever (sprayer, sanding blocks, brushes). Two weekends of work. The kitchen went from embarrassing to the room we show off, and the only thing we did not touch was the layout and the appliances.
The psychological trick is sequencing: do the highest-visibility work first. Cabinets, then hardware, then lighting. If you run out of money or motivation after step two, the kitchen still looks dramatically better.
Quick Answers to Common Questions
Can I paint kitchen cabinets without sanding?
Yes, with a bonding primer designed for glossy surfaces. Degrease thoroughly first; grease is the real enemy, not gloss. Light scuff-sanding still helps adhesion, but bonding primers have made the no-sand job viable.
What is the best paint for kitchen cabinets?
A cabinet-specific enamel or urethane-alkyd paint over bonding primer. Standard wall paint chips within months on cabinets. The specialty paint costs more per gallon and lasts years longer.
Is peel-and-stick backsplash worth it?
For rentals and budget updates, absolutely. Modern versions look convincingly like real tile from normal viewing distance, install in an afternoon, and remove cleanly. Behind the stove, use a heat-rated option.
Should I update appliances or cabinets first?
Cabinets, unless an appliance is failing. Fresh cabinets with old-but-clean appliances look intentional. New appliances with dated cabinets look like a kitchen mid-identity-crisis.
My Budget Kitchen Checklist
- Degrease and paint cabinets. Bonding primer + cabinet enamel. $100-$200.
- Swap knobs and pulls. Match hole spacing. ~$100 for the kitchen.
- Add under-cabinet lighting. LED strips, $30-$60. Instant expensive feel.
- Refresh backsplash and faucet. Peel-and-stick tile + new faucet, ~$200.
- Declutter counters to three items. Free. Doubles the impact of everything else.
What I Would Do Next
Three years later, our $900 kitchen still gets compliments, and we are finally saving for the real countertop replacement with zero urgency. The cheap update bought us time and daily happiness, which is all a budget project needs to do. Start with the cabinets this weekend; everything else follows.
What is the cheapest way to update an old kitchen? Paint the cabinets, swap the hardware, upgrade the lighting, and clear the counters. Under $1,000, two weekends, transformative results.
You do not need a remodel. You need a paintbrush, a screwdriver, and the willingness to start.
Timing your purchases stretches the budget further. Big-box stores run deep discounts on lighting and faucets around holiday weekends, and Habitat for Humanity ReStores often stock new-in-box cabinet hardware and light fixtures for a fraction of retail. I found our $120 faucet marked down to $70 on a Labor Day sale, which paid for the under-cabinet LEDs. Patience at the checkout is part of the budget strategy.
Related reading: How Can I Make Pizza Dough from Scratch Easily.
Related reading: How Can I Improve My Home’s Curb Appeal Cheaply.
Related reading: How Do I Cook Perfect Rice without a Rice Cooker.
For official guidance, check out Family Handyman project walkthroughs and This Old House how-to articles.