
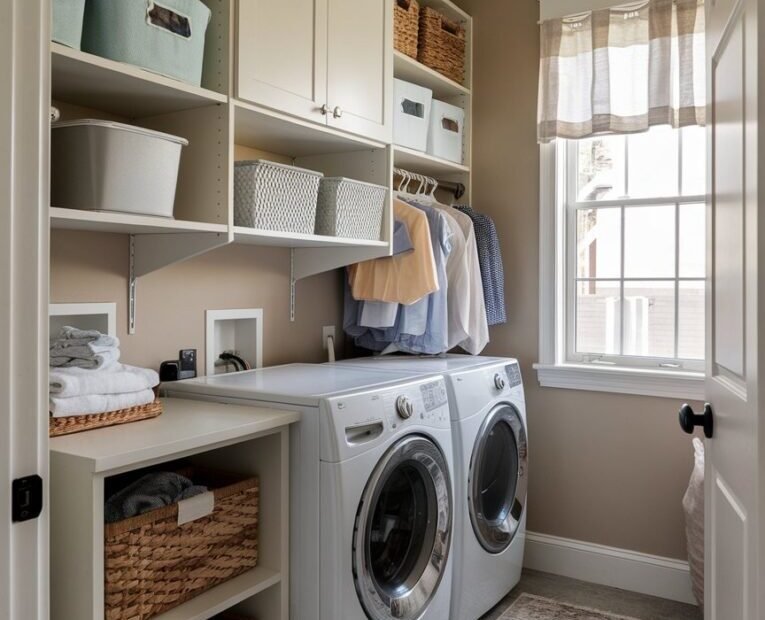
Our laundry room is essentially a wide hallway with a washer and dryer in it, and for years the detergent lived on top of the dryer, the ironing board leaned against the wall like a drunk guest, and lost socks achieved sentience in the corners. Then I spent one weekend and about $180 treating the walls as storage, and the room now holds twice as much while looking bigger.
How to add storage to a small laundry room is almost entirely a vertical game. The floor space is spoken for; the walls and the air above the machines are free real estate.
How Can I Add Storage to a Small Laundry Room?
Start above the washer and dryer, the single most underused zone in the room. A sturdy shelf or wall cabinet mounted 12 to 18 inches above the machines holds detergent, stain treatments, and dryer sheets at arm’s reach. If your machines are front-loaders, add a countertop across both units; it creates folding space and the wall above it becomes prime shelving territory. For top-loaders, use a wall-mounted shelf rather than a counter, and keep clearance for the lids.
Next, think in zones the way professional organizers do. How can I add storage to a small laundry room that actually stays organized? Assign every item a vertical home: cleaning supplies in a wall cabinet, laundry products on open shelving, the ironing board on wall hooks, the drying rack folded flat behind the door, and a slim rolling cart (the 6-inch kind that slides between machines) for the odds and ends. When everything has a wall or a hook, nothing lives on the machines, and the room instantly feels larger.
- Shelf or cabinet above the machines. The highest-value storage in the room. 12-18 inches clearance, sturdy brackets into studs.
- Countertop over front-loaders. Folding space plus a shelf zone above. A plywood top with edge banding costs under $60.
- Slim rolling cart between units. The 6-inch gap cart holds detergent pods, stain sticks, and dryer sheets. $25, life-changing.
- Wall hooks for ironing board and brooms. Get them off the floor and onto the wall. Heavy-duty hooks into studs.
- Over-the-door organizer. The back of the door is free square footage. Use it for cleaning sprays and cloths.
- Pegboard for tools and supplies. Customizable, cheap, and oddly satisfying. Great for small laundry-plus-utility rooms.
- Pull-out drying rack. Wall-mounted accordion racks fold flat when not in use. Better than a freestanding rack eating floor space.
- Stack the machines if possible. Stacking kits ($30) free up half the floor footprint for storage or a folding station.
- Baskets and labels. Open shelving stays tidy only with containers. One basket per category, labeled.
Do not forget the door and the ceiling. An over-the-door rack adds a full shelf of storage without touching a wall, and in rooms with high ceilings, a shelf mounted near the ceiling holds the rarely-used items (extra hangers, seasonal cleaning supplies) that otherwise colonize prime space. The goal is a room where the floor is clear except for the machines; clear floor reads as spacious even when the room is objectively tiny.
The Folding Problem, Solved
Small laundry rooms fail at folding, which is why clean laundry migrates to the couch. If you cannot fit a folding surface, create a folding station elsewhere: a hallway console, a bedroom dresser top, or a wall-mounted drop-leaf table in the laundry room itself. Drop-leaf tables mount to the wall, fold down for sorting and folding, and disappear when the machines need attention. Pair it with a three-bin sorter (lights, darks, delicates) so sorting happens at the source instead of on the floor.
And build the put-away habit into the storage: one basket per family member on a shelf, so folded clothes go directly into their basket instead of onto the nearest flat surface. The storage system should end at the bedroom door, not at the laundry room exit.
Quick Answers to Common Questions
How do I add storage above a top-loader washer?
Use wall-mounted shelves or cabinets with enough clearance for the lid to open fully, typically 18-24 inches above the machine. Avoid deep shelves that force you to reach over the open lid; 12-inch depth is the sweet spot.
Can I stack a washer and dryer myself?
If they are front-loaders designed for stacking, yes, with the manufacturer’s stacking kit ($25-$40). The kit is essential; never stack without it. You will need a second person to lift the dryer safely.
What is the best shelving for a laundry room?
Moisture-resistant options: melamine-coated shelves, metal wire shelving, or sealed wood. Raw particleboard swells in humid laundry rooms. Mount everything into studs; laundry supplies are heavy.
How do I organize a laundry room with no storage at all?
Start with the three highest-impact additions: a shelf above the machines, an over-the-door organizer, and a slim rolling cart. Those three solve 80% of small laundry storage problems for under $100.
My Laundry Storage Checklist
- Mount shelf or cabinet above machines. Into studs. 12-18 in clearance.
- Add slim rolling cart. Fills the dead gap between units.
- Hook the ironing board to the wall. Floor space reclaimed instantly.
- Use the door back. Over-door organizer for sprays and cloths.
- Basket and label everything. Open shelves need containers to stay sane.
What I Would Do Next
Our hallway-laundry now holds all the cleaning supplies for the house, not just laundry, because the vertical storage created surplus capacity. The $180 weekend paid for itself in eliminated duplicate purchases alone; I stopped buying detergent I already owned because I can finally see what I have. Small rooms reward systems more than square footage ever could.
How to add storage to a small laundry room: go vertical above the machines, hook everything possible to walls and doors, use the dead gaps with slim carts, and containerize every shelf. $180 and a weekend doubles the room’s capacity.
The walls are the room you forgot you had. Use them.
Related reading: How Can I Make Iced Coffee Taste Like a Coffee Shop.
Related reading: What Are Cheap High-protein Meals for a Tight Budget.
Related reading: How Do I Winterize My Home Before the Cold Season.
For official guidance, check out This Old House how-to articles and Family Handyman project walkthroughs.