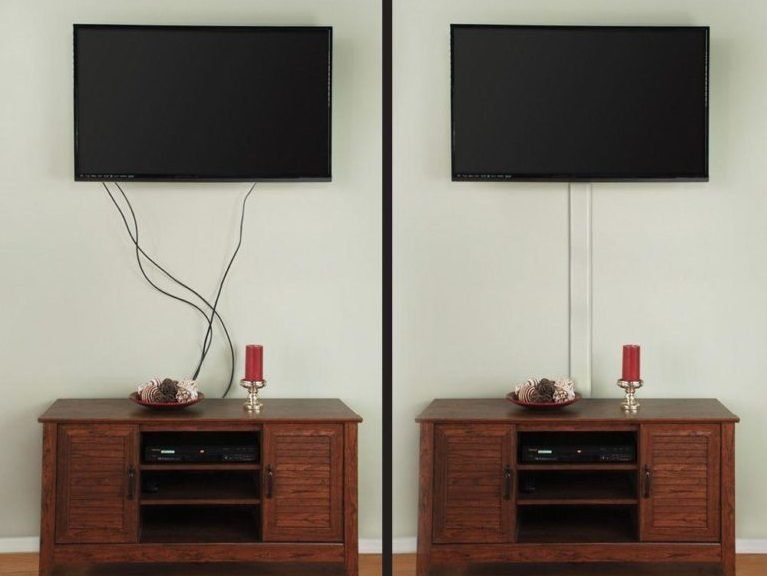
A wall-mounted TV floats like a showroom display — until the eye drops six inches below it and finds the waterfall: power cord, two HDMI cables, an optical lead and something nobody can identify, all dangling against the wall and undoing the entire effect. Hiding TV cords is a ladder of jobs, not a single job, running from a $15 cover that takes half an hour to opening the wall for a fully invisible result. The right rung depends on whether you rent, how the wall is built, and how much the dangling actually bothers you. Here is the ladder from the bottom, with the safety rules that apply at every height.
What you need (by rung)
- A paintable cord raceway or cover kit (about $15) and a small saw or heavy scissors
- Velcro cable ties (about $8) — never zip ties for cables you may re-route
- An in-wall cable management kit with two grommet plates and a flexible tube ($40 to $70)
- A stud finder, a drywall saw and a level, for the in-wall rung
- A quality surge protector (about $25) with a high joule rating
- A label maker or masking tape and a pen — the cheapest item, the one everyone skips
- Short replacement cables in correct lengths (about $30 for the set) if the originals are far too long
Rung 1: Gather, shorten and tie (the free fix)
Before any cover is bought, most of the visual chaos can be removed with hands alone. Unplug everything, then re-route deliberately: cables descending together in one bundle read as a line, cables descending separately read as a mess. Coil the excess length of each cable into a flat loop behind the TV or the media unit and secure it with Velcro ties — Velcro, not zip ties, because zip ties overtighten (which can damage cable jackets) and must be cut for every change. Where cables are hopelessly long, replace them with correct-length versions; a six-foot HDMI doing a two-foot job creates four feet of problem. Power bricks and the streaming stick’s adapter should rest on the media unit or a small mounted basket (about $20), not hang by their cords, which strains both the cord and the port. This rung alone takes most setups from “waterfall” to “one tidy drop,” and for many households it is honestly enough.
Rung 2: The surface raceway (the $15, 30-minute solution)
A cord cover or raceway is a shallow plastic channel that sticks or screws to the wall, carries the bundled cables inside, and snaps shut; painted to match the wall, it becomes a deliberate vertical line that the eye accepts as architecture. This is the 80-percent solution for most people, and there is no shame in stopping here: the difference between dangling cables and a neat raceway is the difference between chaos and intention. It is also the only rung fully available to renters, since it removes without a trace. Install notes that separate neat from sloppy: run it plumb (a level or a measured line — an off-vertical raceway looks worse than cables), cut corners with the kit’s elbow pieces rather than bending cables at hard angles, and enter and exit through the cover’s ends rather than notches cut mid-run. Crutchfield’s home audio and cable management advice covers the same ladder for full home-theater setups, where the cable count runs to dozens and the discipline matters even more.
Rung 3: In-wall routing (the near-invisible result)
The in-wall kit puts the cables inside the wall cavity: one grommet plate behind the TV, one near the floor outlet, joined by a flexible tube fished through the wall, at $40 to $70 and about an hour of work. The checks come before the saw. Confirm the wall is an interior stud wall (exterior walls carry insulation and vapor barriers that complicate fishing), scan for studs and, above all, for existing electrical runs and plumbing in the bay you plan to use — a $20 inspection camera or a careful look through a small pilot hole saves drywall surgery. Horizontal fire blocks inside some walls stop a straight drop and force a same-bay plan: both plates within one stud bay, which usually simply means placing the lower plate below the TV rather than beside the console. Cut the plate holes with a drywall saw, fish the tube, pull cables through with the HDMI connectors taped and protected, and seat the plates. The result is the showroom look: a floating screen with nothing below it but shadow.
The power safety rules (they outrank the aesthetics)
One rule governs the whole ladder and is not negotiable: a TV’s ordinary power cord must never run inside a wall. Standard appliance cords are not rated for in-wall use — it violates electrical code and can void insurance — which is why legitimate in-wall kits handle power in one of two code-compliant ways: a kit with its own rated in-wall power extension and recessed outlets, or a new recessed outlet installed behind the TV by an electrician ($100 to $150). Signal cables (HDMI, optical, ethernet) are the low-voltage passengers the basic kit is designed for; power takes the rated path or stays outside the wall in the raceway. Second rule: do not daisy-chain power strips, and do not consolidate a home theater onto a $5 strip from a drawer — one quality surge protector, sized for the load, not chained. Third: keep cables away from heat — a raceway routed behind a radiator or an in-wall run past a flue is a problem the cover cannot hide.
The console end: where the cables land matters too
Cord-hiding projects usually fix the wall and ignore the destination, where a second, smaller chaos often lives behind the media console. The same discipline applies at ankle height: one bundle, Velcro-tied, running in a straight line; power bricks laid flat in a cable box or basket (about $20) with ventilation, not wadded behind components where their heat has nowhere to go; devices spaced so their vents breathe. A cable box tames the power strip, the bricks and the slack of four devices in one lidded container, and it makes the floor under the console vacuum-able, which is how you know the job is actually done. Labels matter most exactly here, because the console end is where things get unplugged: the day a router must be reset or a console moved, the labeled bundle is a five-minute task and the unlabeled one is an afternoon of tracing wires by hand. Spend the labeling time before the covers close, at both ends, every time.
Future-proofing: the next TV thanks you
Every cord solution should assume the equipment changes. The raceway chosen should have a spare channel’s worth of room; the in-wall tube should be fished with one empty pull string left inside it, so the next cable — a new format, a soundbar lead, an antenna run — can be drawn through in minutes instead of reopening the wall; and one more HDMI than today needs should be run while the wall is open, because cables are cheap and wall surgery is not. Connector standards turn over every few years, but the wall geometry does not, and the households that left a pull string and a spare run are the ones whose upgrade day is an errand rather than a project. Photograph the open wall before the plates close, with a tape measure in frame, and file the picture with the house records: future stud-finding, plate placement and troubleshooting all start from that photograph.
A special word for the soundbar and the gaming console, the two devices that defeat most tidy setups: the soundbar adds its own power and often an optical or HDMI-ARC lead that must travel with the TV’s bundle, and the console adds heat, which means its cables should route away from its vents rather than being bundled against them. Give heat-producing boxes air first and tidiness second; a melted-sleek installation that cooks a console has mistaken the goal. Short optical cables and right-angled HDMI adapters exist precisely for the tight turns behind wall-mounted screens, and they cost less than the cables they save from strain.
Rung 4, and knowing your stopping point
The final rung — recessed outlet, in-wall everything, equipment in a closet with an infrared repeater — is the custom-installer’s territory at $100 to $200 and up, and it is worth its price exactly when the room justifies it. Most households should stop one rung earlier than their ambition suggests, because the honest totals are these: raceway $15 and 30 minutes, in-wall kit $50 to $70 and an hour, electrician’s recessed outlet $100 to $150. The viewing experience gained between the raceway and the full in-wall treatment is real but modest; the cables disappear either way from the sofa. That perspective is also why the living-room budget usually earns more spent on the lighting the TV is watched under — the subject of how much it costs to install recessed lighting — than on the last ten percent of cable invisibility. Pick your rung, label every cable at both ends before you close anything up, and enjoy the floating screen.