A doorknob went through our hallway wall during a move, leaving a crater that stared at me for three months while I worked up the nerve to fix it. When I finally did, it took an afternoon and $15, and the repair is invisible. Drywall patching has the highest intimidation-to-difficulty ratio of any home repair.
Here is how to patch a hole in drywall yourself, sized to your hole: nail holes, medium holes, and the big ones.
How Do I Patch a Hole in Drywall Myself?
Tiny holes, from nails and screws, are nearly free to fix. Push a dab of spackle into the hole with a putty knife, scrape flush, let it dry, sand lightly with 120-grit, and touch up with paint. Ten minutes per hole plus drying time. Pro tip: spackle shrinks as it dries, so slightly overfill and sand flat rather than trying to get it perfect wet.
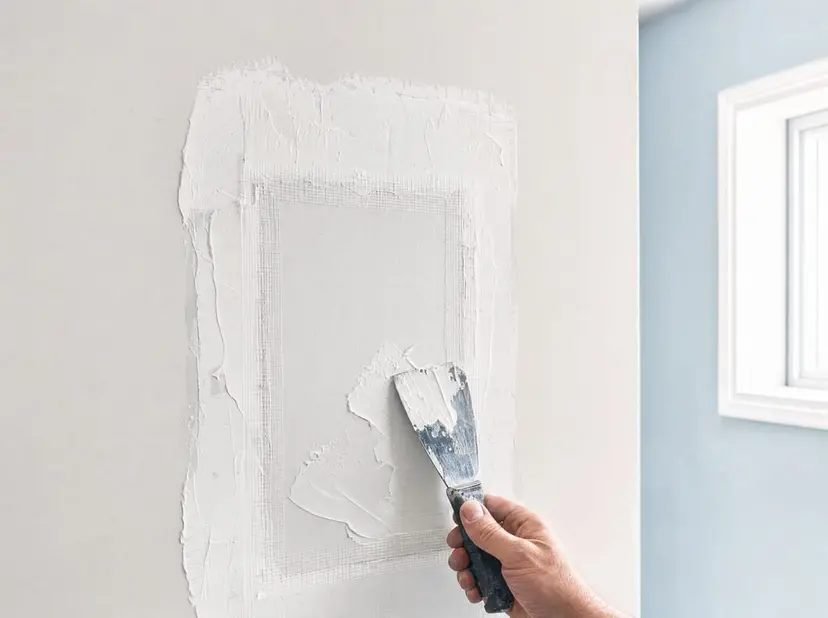
Medium holes, up to about 6 inches (the classic doorknob crater), need a patch. How do I patch a hole in drywall myself at this size? The self-adhesive mesh patch method: stick the mesh patch over the hole, spread joint compound over it with a putty knife in thin layers, feathering the edges wide. Let each coat dry fully (it turns white when dry), sand lightly between coats, and apply two to three thin coats rather than one thick one. Thick coats crack and take forever to dry. The mesh patch kits cost about $8 and include everything.
- Small holes: spackle and sand. Overfill slightly, sand flat when dry. Ten minutes.
- Medium holes: mesh patch + joint compound. Thin coats, feathered wide, 2-3 layers. $8 kit.
- Large holes: cut a drywall patch. Square the hole, screw in backing boards, fit a drywall piece, tape the seams, compound, sand, paint.
- Always use thin coats. Thick compound cracks. Multiple thin layers are the pro secret.
- Feather edges wide. Extend compound 6-12 inches beyond the patch. The eye sees bumps, not patches.
- Sand between coats. 120-grit, light touch, dust mask on. Smooth is the goal.
- Prime before painting. Joint compound absorbs paint differently. Primer prevents flashing.
- Match the texture. Orange-peel texture spray cans blend patches into textured walls.
Large holes, bigger than 6 inches, need the California patch or a screwed-in drywall piece. Square up the hole with a drywall saw, screw wood backing strips inside the edges, cut a drywall piece to fit, screw it to the backing, then tape the seams with paper tape and build up joint compound in thin feathered coats. It sounds involved, but it is the same skills as the medium patch, just scaled up. The materials cost under $20; the patience is the real expense.
The Invisible Finish: What Pros Do Differently
The difference between a visible patch and an invisible one is entirely in the finishing. Pros feather compound far wider than amateurs think necessary, sometimes 12 inches beyond a small patch, because the eye detects abrupt thickness changes, not the patch itself. They sand with a light touch and a sanding sponge, prime the repair (unprimed compound flashes through paint as a dull spot), and match the wall texture. For orange-peel or knockdown textures, a $15 texture spray can makes the patch disappear. Practice the spray pattern on cardboard first.
Lighting reveals everything, so do your final sanding check with a work light held at an angle to the wall. Raking light shows bumps that overhead light hides. Fix them now, not after painting.
Quick Answers to Common Questions
How long does drywall patching take?
Active work: 30 minutes to 2 hours depending on hole size. Total time: a day or two, because joint compound needs hours to dry between coats. Quick-set compound (20 or 45 minute) speeds this up for the impatient.
Can I patch drywall without a patch kit?
For small holes, yes, spackle alone works. For medium holes, the mesh patch is worth the $8. For large holes, a scrap of drywall and some wood backing strips from the hardware store do the job.
Why is my patch visible after painting?
Usually one of three causes: compound not feathered wide enough, no primer under the paint (flashing), or texture mismatch. Sand wider, prime, and match texture.
Do I need to prime before painting a patch?
Yes. Joint compound is more porous than painted drywall and absorbs paint unevenly, leaving a dull spot called flashing. One coat of primer solves it completely.
My Drywall Patch Checklist
- Size the hole, pick the method. Spackle, mesh patch, or cut-in drywall piece.
- Thin coats, feathered wide. Multiple thin layers beat one thick one.
- Sand between coats with dust mask. 120-grit, light touch, raking light check.
- Prime the repair. Prevents flashing. Non-negotiable.
- Match texture, then paint. Texture spray for orange-peel walls. Practice first.
What I Would Do Next
That hallway crater is gone, and I mean gone; I have to think hard to remember which wall it was on. The whole repair cost $15 and taught me a skill I have used five times since. Drywall is forgiving stuff. It wants to be fixed, and it forgives beginners generously.
How to patch a hole in drywall yourself: match the method to the hole size, use thin feathered coats, sand between layers, prime, and match the texture. $15 in materials, one afternoon, invisible results.
Stop staring at the hole. Fix it this weekend and enjoy the strangest satisfaction in homeownership.
If drying time is your bottleneck, quick-set joint compound (the 20-minute and 45-minute varieties sold in bags) lets you apply multiple coats in a single day. It sets chemically rather than drying, so humidity does not slow it down. The trade-off is a shorter working window; mix small batches and work fast. For a Saturday repair you want painted by Sunday, quick-set is the answer.
Related reading: What Is the Best Way to Insulate an Attic on a Budget.
Related reading: What Is the Best Flooring for Homes with Dogs.
Related reading: How Much Does a Small Bathroom Remodel Cost.
For official guidance, check out This Old House how-to articles and Family Handyman project walkthroughs.