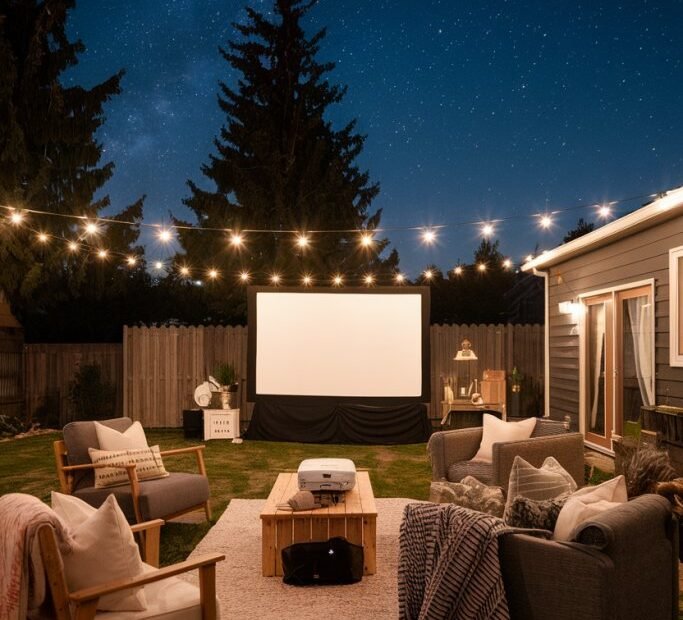
Here is the surprising part of backyard movies: the projector is the part everyone upgrades first, and it is the part that matters third. Sound comes first. The screen comes second. Only then does the projector itself decide much, and by that point placement and darkness matter more than price. A modest projector with strong audio, a flat screen, and a truly dark yard will beat an expensive projector shouting through its own tiny speaker at a wrinkled sheet every single night. Work through the steps in order and each dollar lands where ears and eyes actually notice it.
What to Gather Before the First Step
Most of the kit is probably already at home. The essentials are a projector, one external speaker with a cable that fits it, a screen or a smooth light-colored surface, one heavy-duty outdoor extension cord, gaffer tape or cable covers, seating, and a box fan. Useful extras cost little: a white blackout-curtain panel or a purpose-made screen in the $30 range, citronella candles or coils, a power strip rated for outdoor use plugged into a GFCI outlet, and a plastic storage bin that holds the whole setup between nights. Check the speaker cable length before show day. Bluetooth works, but a wired connection avoids the lip-sync lag that makes dialogue feel dubbed, so a long aux cable is worth its few dollars.
Step 1: Put Real Sound Next to the Seats
Disconnect the idea of sound from the projector. Built-in projector speakers point the wrong way, sound thin, and lose a fight with open air, passing cars, and crickets. Place a portable PA speaker or a solid Bluetooth speaker close to the seating instead, wired to the projector or streaming device, and aim it at the audience rather than across the yard. Sound that travels six feet to the seats sounds full at half the volume that sound traveling twenty feet needs, and lower volume keeps neighbors friendly.
Spend here first if money is being spent at all. A speaker budget of $50 to $150 transforms dialogue clarity and gives music and effects real weight. Test with a dialogue-heavy scene in daylight setup hours, not during the film. If words blur, move the speaker closer or raise it to ear height on a stand or crate. Two smaller speakers flanking the screen can widen the sound, but one decent speaker near the seats beats two weak ones every time. Keep volume in check after 10 p.m. and warn close neighbors about movie nights, ideally with an invitation. Goodwill is a piece of equipment too.
Step 2: Give the Image a Flat, Tight Screen
A bedsheet fails in three ways: it wrinkles, it lets light leak through, and it ripples in any breeze. Each flaw softens the picture. Replace it with a purpose-made outdoor screen or a blackout-curtain panel in matte white, stretched drum-tight on a frame, a fence, or a wall. Tight is the key word. Pull corners evenly, clip or bungee each side, and check from the seats for diagonal creases catching light. A smooth surface looks brighter than a wrinkled one under the exact same projector, because the image stops scattering into folds.
Size the screen to the seating distance rather than to ambition. A picture around 100 to 120 inches across suits most yards, with the front seats roughly ten to twelve feet back. Bigger is not better if viewers in the front row have to turn their heads during action scenes. Anchor the frame against wind with stakes or weights, since a sailing screen ends a night faster than rain. If a pale garage door or smooth wall is the screen, it can work well — just wash off streaks and accept that texture will show slightly in bright scenes.
Step 3: Place and Focus the Projector Properly
Only now does the projector take its turn. Set it centered on the screen, level, and at the distance its lens needs for the chosen size — the throw distance. Guessing wastes sharpness. A quick check of ProjectorCentral’s projector reviews and setup advice gives throw calculators and brightness guidance for specific models, so the projector lands in the right spot the first time instead of being shuffled around in the dark. Put it on a stable table that nobody will bump, at a height near the middle of the screen, and route its cable so feet never cross it.
Focus at the screen, not from the projector. Stand at the screen with a helper at the lens, or use the remote from a seat and zoom until text — a menu or subtitles — reads crisp edge to edge. Use keystone correction as a last resort, because heavy keystone shrinks resolution; leveling the projector physically is cleaner. Then wait for real dark to judge brightness. For outdoor use, a projector rated around 2,500 lumens or higher handles a yard with some stray light, but a dimmer model at full dark can still look rich once steps four has done its work. Start time beats specs: schedule the feature for at least thirty minutes after sunset, and fill the gap with the pre-show in step six.
Step 4: Hunt Down Every Stray Light
Ambient light washes out a backyard picture more quietly and more completely than any weak projector. Walk the yard at the planned start time and list what glows: porch lights, kitchen windows, string lights, a streetlight over the fence, a neighbor’s floodlight. Turn off everything under household control, move string lights behind the seating where they read as decoration instead of competition, and angle the screen away from streetlights. A screen placed with its back to the brightest stray source wins half the battle before any setting is touched.
Talk to neighbors before a big night rather than after a complaint. A short, friendly word — movie night Saturday, done by eleven, porch light off would help hugely, come over if free — solves most spill problems. If a light cannot be moved or switched off, a tall plant, a fence panel, or a shade sail between it and the screen can block the direct line. Judge the result from the worst seat, usually the one at the widest angle, because a picture that looks fine dead center can look grey from the side.
Step 5: Set Power, Seating, and Bug Defense
Run one heavy-duty outdoor extension cord from a GFCI outlet to the setup, rather than chaining household cords and strips across wet grass. Tape the cord down anywhere a path crosses it, keep every connection off the ground and dry — an upturned plastic bin makes a decent rain shield for a junction — and unplug the run at the end of the night. Keep the projector and speaker on that single planned feed so a trip or fault is easy to trace in the dark.
Arrange seating in tiers so heads stop blocking views. Low blankets and floor cushions at the front, standard chairs in the middle, taller chairs or a bench at the back. Test sightlines by sitting in each row before guests arrive. Leave a center aisle for trips to snacks and the house, and keep that aisle clear of cables. Comfort extras pay off all night: spare blankets in a basket, a small table per row for drinks, and cushions for hard chairs.
Bugs get their own plan. Mosquitoes fly weakly, so a box fan blowing gently across the seating keeps them from landing better than sprays alone. Set citronella candles or coils at the edges of the seating zone, away from blankets, and drain or cover standing water nearby earlier in the day. Offer spray at the door for guests who want it. A screened pre-show snack table keeps food from becoming a second battle with insects.
Step 6: Run a Real Pre-Show and Pick the Right Film
Gear ends at good. Hosting carries the night to memorable, and it starts twenty minutes before the feature. Put on music, trailers, or a cartoon short while the last daylight fades. The delay is functional — the picture needs full dark — and social, giving latecomers a soft landing and early arrivals something better than watching a blank screen. Anyone refining the indoor version of the same evening can borrow from how to host a movie night at home like a theater, since concession and seating ideas translate straight to the yard.
Concessions cost little and change the mood out of proportion to their price: stovetop popcorn with real butter, boxed candy, sodas and water on ice, nachos if the setup allows warm cheese without a long cable run. Serve in containers that survive grass and laps. Announce the film and any double feature like a tiny program. It takes ten seconds and makes the screening feel chosen rather than defaulted.
Program for the venue. Films with big visuals, clear dialogue, and steady pace — action adventures, animation, beloved classics, broad comedies — hold up against crickets, distant traffic, and rustling. Quiet, whisper-heavy dramas fight the yard and usually lose, however good they are indoors. Check the forecast during the day, and rehearse a sixty-second takedown: projector and speaker under cover or inside first, screen second, everything else later. Electronics never stay out overnight; dew and temperature swings shorten their lives fast. Design storage so setup takes ten minutes next time, with cables coiled in the bin and the screen on quick mounts. The best backyard setup is not the priciest one. It is the one that goes up fast, sounds full, looks flat and bright, and gets used every clear Friday until the season turns.