
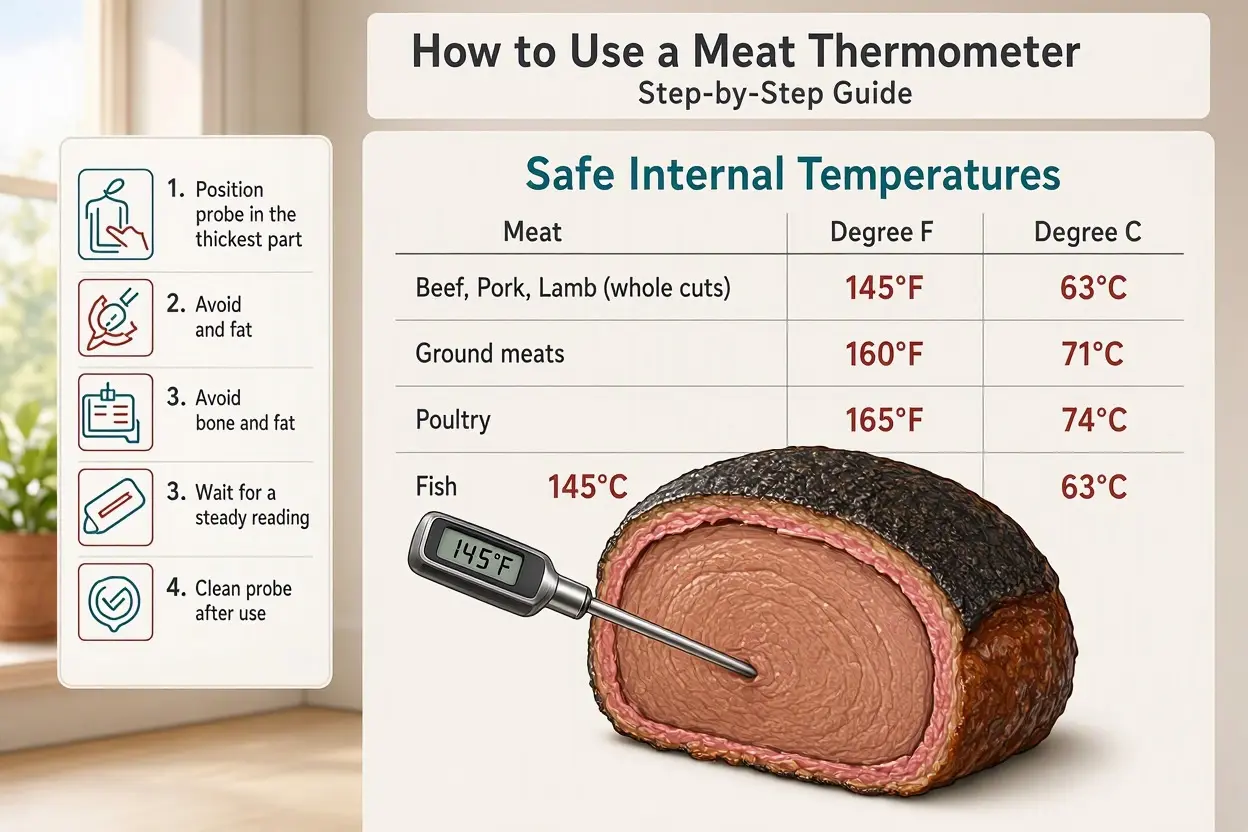
Here is a strange truth about American kitchens: the meat thermometer is one of the most commonly owned cooking tools and one of the least used. It sits in the drawer through hundreds of dinners while its owner does what cooks have always done — cuts the chicken open to peek at the juices, presses the steak and compares it to the fleshy part of a thumb, guesses. Then, a few times a year, someone gets a dry turkey or a worryingly pink burger. This guide fixes the whole chain: how to actually use a thermometer well, the temperatures that matter, where to place the probe in each kind of meat, and an honest pros-and-cons verdict on the three types you can buy, so the one in your drawer finally earns its space.
The Basic Technique (It Is Simpler Than You Think)
Whatever type you own, the method is the same five moves. First, take the meat off the heat or open the oven/grill — you are measuring, not cooking, during the reading. Second, slide the probe into the thickest part of the meat, aiming for the center of that thickness. Third, keep the probe tip away from bone, gristle, and big pockets of fat, and make sure it is not poking through to a hot pan or rack — all four give false readings, usually falsely high. Fourth, wait for the number to stop climbing and settle; that settled number is your reading, and on a slow dial thermometer the wait can be fifteen to thirty seconds. Fifth, compare with the chart below — and remember that meat keeps cooking as it rests, rising a few degrees, which the smart cook plans for rather than discovers.
Timing matters too. Start checking when the meat is roughly three-quarters of the way through its expected cooking time — early enough to correct course, late enough that you are not letting heat out every five minutes for nothing. On a grill, that usually means one planned check, a short wait based on how far the reading has to climb, and one confirming check. In an oven, cluster your checks the same way. Cooks who “use the thermometer constantly” often just use it late and decisively, and their results are better for it: the door stays shut, the temperature climbs undisturbed, and the two readings they take are the two that count.
The Temperatures That Matter (USDA)
These are the US Department of Agriculture’s safe minimum internal temperatures — the numbers food safety is built on. The full official chart lives at FoodSafety.gov’s safe minimum temperature chart, and it is worth a bookmark.
| Food | Minimum internal temperature | Rest time |
|---|---|---|
| Beef, pork, veal & lamb — steaks, chops, roasts | 145°F (63°C) | 3 minutes |
| Ground beef, pork, veal & lamb | 160°F (71°C) | None |
| Ground poultry | 165°F (74°C) | None |
| All poultry — whole, pieces, breasts | 165°F (74°C) | None |
| Fish and seafood | 145°F (63°C) | None |
| Leftovers and casseroles (reheating) | 165°F (74°C) | None |
Two points about this chart surprise people. The first is the rest time on whole cuts: 145°F plus a three-minute rest is the safe standard for a steak or pork chop — the rest is part of the safety, not a suggestion. The second is that ground meat plays by stricter rules than whole cuts, because grinding mixes surface bacteria through the meat; that is why a burger needs 160°F while the steak it could have been needs only 145°F.
Steak Doneness Is a Different Question
Separate from safety minimums is preference. Restaurants and steak lovers use a doneness ladder for whole beef steaks: roughly 125°F for rare, 130–135°F for medium-rare, 140–145°F for medium, and 150–155°F for medium-well, pulling the steak off the heat about five degrees below your target because resting carries it the rest of the way. Know the trade you are making: below the USDA’s 145°F minimum you are accepting some added risk — small for a fresh whole-muscle steak from a good source, and a more serious consideration for anyone pregnant, older, very young, or immunocompromised, and never a game to play with ground meat or poultry. The thermometer’s gift here is not judgment; it is that medium-rare becomes a number you can hit on purpose instead of a mood you hope for.
Carryover Cooking: the Temperature Rise After the Heat
The chart gives you the temperature the meat must reach, but the reading you pull it off the heat at should be a little lower, because a resting piece of meat keeps cooking from the outside in. As a working rule: thin cuts like steaks and chops climb about 5°F during their rest; a chicken or a modest roast climbs 5–10°F; a big turkey or a large beef roast can climb 10–15°F at the center while it sits. This is why experienced cooks pull a roast at 130–135°F for a 145°F finish and why “it was perfect in the oven and overdone on the plate” is the most common thermometer complaint of all — the thermometer was right both times, and carryover did the rest. Plan the landing, not just the takeoff: decide your target from the chart, subtract the expected climb for the size of what you are cooking, and make that smaller number the one you watch for.
Where the Probe Goes, Protein by Protein
Whole chicken or turkey: the innermost part of the thigh, the innermost wing, and the thickest part of the breast — check the thigh first and avoid the bone; the lowest reading of the three is the bird’s true number, and it must reach 165°F. Chicken pieces and breasts: slide the probe sideways into the thickest part so the tip lands in the center; thin breasts fool probes inserted from the top. Steaks and chops: in from the side, tip at the center — top-down probing of a one-inch steak nearly always overshoots into the pan zone. Roasts: dead center of the thickest section, and check a second spot on very large roasts, because big cuts cook unevenly. Burgers and patties: sideways through the edge into the middle; a stack of two patties probed together lies to you. Fish: the thickest part, and gently — fish flakes around a probe, so ease it in at an angle. When in doubt, take two readings; a thermometer is fast, and the second number is the one that lets you serve with confidence.
The Three Types of Thermometer, Honestly Weighed
Digital instant-read thermometers
Pros: a settled reading in two to five seconds, accuracy typically within a degree, a thin probe that leaves a small hole, and prices from about $12 for a decent one to $100 for the professional favorite (the Thermapen class). Folding models store safely in a drawer. Cons: it cannot stay in the meat while it cooks — every check means opening the oven or lifting the grill lid — and it runs on a battery that will, by law of kitchens, die on Thanksgiving. You also have to be present and attentive; it measures when you ask, not continuously. Best for: almost everyone, as a first and possibly only thermometer.
Dial (analog) thermometers
Pros: no battery, ever; cheap, often under $10; some models are oven-safe leave-in designs; and they are nearly indestructible. Cons: slow — fifteen to thirty seconds to settle, an eternity with a grill lid open and heat escaping; the dial is easy to misread by five degrees; the thick stem needs a deep pocket of meat to read accurately, making it poor for thin cuts; and they drift out of calibration with drops and time. Best for: a backup, a camping kit, or anyone who values never-dead over fast — provided you calibrate it (below) and accept the wait.
Leave-in probe and wireless thermometers
Pros: a probe rides in the meat from start to finish, cabled to a base or beaming to your phone, with alarms at your target temperature — the only design that truly watches dinner for you. This is how brisket, pulled pork, and holiday turkeys get stress-free: no lid-lifting, no guessing, and graphs if you want them. Cons: the most expensive route (roughly $30–100+), cables dislike grill lids and direct flame, wireless probes have range and battery quirks of their own, and a probe left in one spot tells you about that spot only — placement discipline matters even more. Best for: smokers, roasters, and anyone cooking large cuts where opening the cooker costs real heat.
The tempting fourth option: infrared thermometer guns
Pros: point, click, instant number — wonderful for checking a pizza steel, a griddle, or the surface of a cast-iron pan before a sear. Cons: decisive ones for our purpose. An infrared gun reads surface temperature only. It cannot see the center of a chicken breast, which is the entire question a meat thermometer exists to answer, and shiny or steamy surfaces fool it further. Owning one as a companion is fun; using one as your meat thermometer is how undercooked food gets a false sense of precision. It belongs in the verdict as a firm “not this.”
The Verdict
Buy the digital instant-read first — it is the best tool for the most cooking, and a $15 one used faithfully beats a $100 one in a drawer. Add a leave-in probe when your cooking grows toward roasts, smokers, and big holiday birds, because alarms change the experience completely. Keep a dial around only if you calibrate it and accept its slowness for what it is. But the honest verdict of this whole guide is less about which you buy: the thermometer that matters is the one you use every time, including Tuesday-night chicken breasts — the drawer is the least safe temperature tool in your kitchen.
Calibrate in One Minute With Ice Water
Thermometers drift, and there is a free, definitive test. Fill a glass with crushed ice, add just enough cold water to fill the gaps, stir, and let it sit a minute. Insert your probe without touching the glass sides or bottom. It should read 32°F (0°C). If it reads a few degrees off, many digitals have a calibration button or a reset procedure in the manual; dial models often have a small nut under the dial you turn to correct it. A thermometer that cannot be brought back to 32°F in ice water should be retired — every reading it gives you is a rumor. Test twice a year, and always after a drop onto tile.
Special Cases With Rules of Their Own
Stuffed meats: the stuffing itself must reach 165°F, measured in the center of the stuffing — the meat around it can be done while the middle is still in the danger zone, which is why food-safety guidance suggests cooking stuffing separately whenever you can. Very thin cuts: a fish fillet, a thin burger, or a cutlet defeats a probe aimed from above; slide the probe in from the side, or fold/stack two identical pieces and probe the doubled thickness as a stand-in. Low-and-slow barbecue: brisket and pork shoulder famously stall — the internal temperature parks itself around 150–165°F for hours while moisture evaporates — and they are also the exception to “cook to the number”: barbecue is done when the probe slides in with almost no resistance (often somewhere in the 195–205°F range for brisket), with temperature as the map and tenderness as the destination. Reheating leftovers: bring them back to 165°F and spot-check the middle of the dish rather than the edges, which run hot and flatter you. Each of these is a small amendment to the same central law: the number that matters is the one at the coldest point of the food.
Care, Cleaning, and Not Cross-Contaminating Dinner
A meat thermometer touches raw meat mid-cook, which makes it a hygiene tool as much as a temperature tool. Wash the probe with hot, soapy water (or wipe it with a sanitizing wipe) between checks whenever it has been in meat that is not yet at a safe temperature — otherwise you can carry bacteria from a half-cooked reading straight back into the finished dish on your “final check.” Most digital probes are splash-resistant, not submersible: wash the metal stem, keep the body out of the sink. Store the thermometer where the probe will not get bent or the tip dulled — many digitals come with a sheath for exactly this reason — and keep a spare battery wherever the thermometer lives, purchased before the holiday, not during it. Treated this way, a decent instant-read lasts for years and stays the cheapest insurance policy in the kitchen: one bout of food poisoning costs more than every thermometer in this guide combined.
The Mistakes That Make Good Tools Give Bad Readings
Probing too early and too often tops the list — every check before the meat is nearly done costs heat and time, so estimate first and measure near the end. Next: touching bone, which reads hot and has sent a thousand undercooked chickens to the table. Shallow probing — the tip must sit in the thermal center, not the outer half-inch. Reading through a sizzling pan by leaving the probe in while meat cooks on a stove burner (instant-reads are not leave-ins; their plastic housings melt). And resting meat uncovered in a cold spot, then blaming the thermometer for the temperature drop it honestly reports. Avoid these five and even a modest thermometer becomes a precision instrument — which, in the end, is the whole point: fewer dry turkeys, no pink-chicken roulette, and steaks that land where you aimed them. For the kitchen-habits file, our step-by-step guide to reducing plastic waste in your kitchen pairs nicely — same room, same spirit of small systems that just work.