That little oil can light on your dashboard is not telling you the oil is low. It is a pressure alarm. By the time it lights up, pressure has already dropped far enough that damage may be starting inside the engine. Waiting for it to warn you is like waiting for a smoke alarm to tell you dinner is ready. The check that actually protects you takes about two minutes, costs nothing, and needs no tools beyond a rag — but it only gives you a true answer if you do it in the right order.
Texas makes this small job matter more than it does in cooler states. Heat thins oil, long highway runs hide a slow loss mile after mile, and an engine that burns a little oil in mild weather can burn noticeably more through a summer of 100-degree days. A level that looked fine in spring can be a quart low by August without a drip on the driveway to warn you. The dipstick is still the most honest gauge you own, as long as you read it correctly.
What you need before you start
You need very little. A clean rag or a plain paper towel that will not leave lint behind. A quart of the exact oil grade printed on your filler cap or listed in the manual, kept ready in case you need to top up. A funnel helps if the filler neck is narrow, though a careful pour works too. And you need flat ground and a few spare minutes. That is the whole kit. If you want a second opinion on intervals and grades beyond your manual, Consumer Reports’ car maintenance and oil guidance is a solid plain-language reference to keep bookmarked.
Do not bring guesswork to the grade. The number on the cap, something like 0W-20, was chosen for how that engine starts cold and flows hot. Going thicker because Texas is hot sounds sensible and is not. The grade on the cap already accounts for hot weather.
The check, step by step, in order
Step 1: Park on level ground
Oil settles level in the pan, and the dipstick measures that settled surface. Park on a slope and the oil pools to one side, so the stick reads high on one kind of slope and low on the other. A typical sloped driveway is enough to lie to you. Use a flat parking spot, a garage floor, or any stretch of ground you trust to be level. If you just pulled in on a hill, move the car before you check. This one detail decides whether the rest of the reading means anything at all.
Step 2: Turn the engine off and wait five to ten minutes
While the engine runs, oil is up in the top of the motor, coating parts and draining back slowly. Check too soon and the pan holds less than the engine actually has, so you will think you are low when you are not. Turn the engine off and give it five to ten minutes. That pause lets oil drain back down to the pan where the dipstick can measure it. Checking first thing in the morning, before the engine has run at all, works just as well, since everything has drained down overnight.
Step 3: Pull, wipe, push back in, then pull again
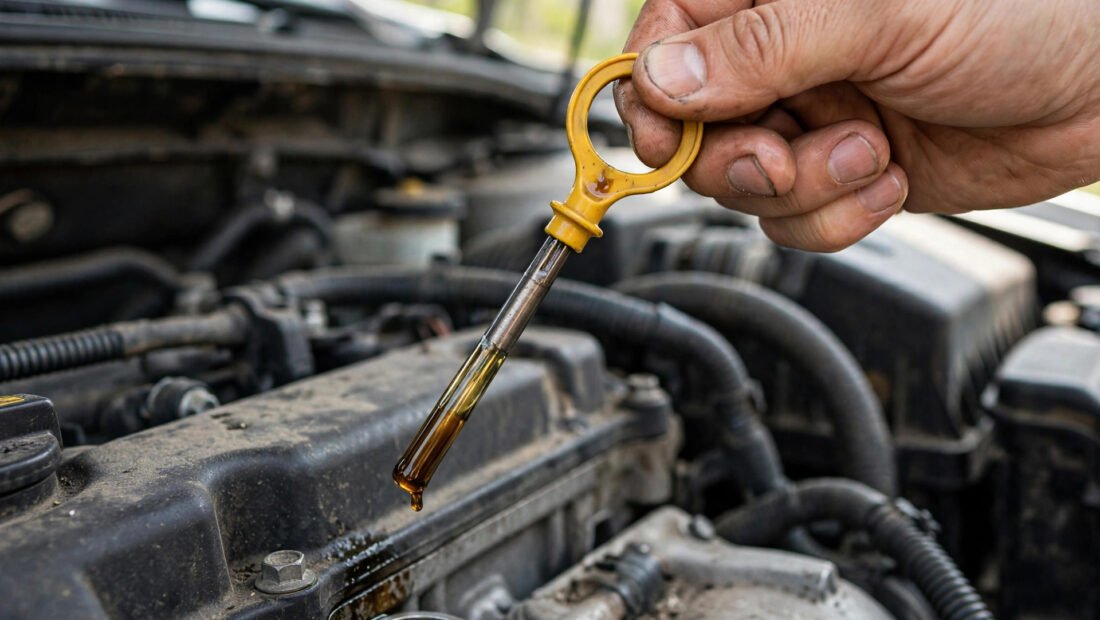
Find the dipstick, usually a bright loop handle marked for engine oil. Pull it out and look, but do not trust that first look. Oil splashes up the tube while you drive, and that splash coats the stick well above the true level. Wipe the stick completely clean with your rag. Push it all the way back in, seat it fully, then pull it out again. The second pull is the true reading. Skipping the wipe is the most common reason people overfill, because they add oil to fix a low reading that was never low, or walk away calm from a splash reading that hid a real shortage.
Step 4: Read the level between the marks
The end of the stick has two marks, two holes, or a hatched zone. The oil film should sit between the low and full marks. Near full is ideal. In the middle is fine. At the low mark or below it, you need to add oil before you drive much farther. Learn this number too: the gap between the low mark and the full mark is roughly one quart on most cars. So if the film sits halfway between the marks, you are about half a quart down. That rough measure tells you how much to pour in step six without guessing.
Step 5: Read the condition, not just the level
A dipstick tells two stories, and the second one gets ignored. Rub a drop of oil between your thumb and finger and look closely. Amber and smooth is healthy oil doing its job. Dark brown or black oil is not automatically bad, since oil darkens as it carries dirt in suspension, but texture and smell matter more than color alone. Milky or frothy oil points to coolant getting in where it should not be, and that needs a mechanic, not a top-up. Gritty oil that feels sandy between your fingers points to wear or oil that has gone far too long between changes. A strong burnt smell means the oil has been cooked by heat and hard use. Any of those last three findings matters more than the level itself.
Glance under the filler cap too. A little pale residue can come from short trips that never fully warm the engine. Thick, milky buildup that keeps coming back belongs in the same conversation as milky oil on the stick, and a shop should find out why.
Step 6: Top up in half-quart pours, and recheck as you go
If the level is low, add oil slowly, about half a quart at a time, using only the grade on the filler cap. Wait a short moment for the new oil to drain into the pan, then repeat steps three and four to read the stick again. Sneak up on the full mark. Never pour in a whole quart on faith and drive off. Overfilling is not harmless extra insurance. Too much oil can foam as moving parts whip through it, and foamy oil does not protect the way liquid oil does. Bad overfills can also stress seals. Stop at full, not above it, and put the cap back on tight.
If your car has no dipstick
Many newer cars have dropped the dipstick entirely. Those cars read the level electronically and show it in a dash menu. The broad shape is similar: park level, use a warm engine, open the oil level screen, and wait while it measures. Beyond that, the manual’s version of the procedure governs, because each maker sets its own steps and timing. Follow your manual exactly rather than copying a routine from a different brand. After an oil change, check that screen once. If the number stops making sense or never appears, raise it at service.
Why Texas engines use oil faster
Heat does two things at once. It thins the oil, and thinner oil slips more easily past piston rings and valve seals, where a small amount burns away in normal running. Every engine uses some oil. The question is how much, and Texas summers push the number up, especially on older engines with miles on those seals and rings. A common pattern for older Texas engines is about a quart every 1,000 to 2,000 miles. That is a habit to manage with regular checks and top-ups, and it is one reason how often you should really change your oil matters alongside the level, since oil that is both low and old protects far less than oil that is only one of those things.
Draw a firm line at a quart every 500 miles. That is not a habit. That is a diagnosis waiting to happen. At that rate, something is worn or leaking: rings, valve seals, or an external leak that only shows itself under pressure while driving. Blue smoke on startup often points toward valve seals. Blue smoke when you accelerate points more toward rings. Wet spots where you park point to a leak you can hunt. No smoke and no spots, yet the level keeps falling, usually means the oil is burning inside the engine or leaking only on the move. Either way, topping up forever is not a plan.
Finding a leak without paying shop rates first
A home leak hunt can be cheap and genuinely useful. A UV dye kit runs about $15 and a UV flashlight about $10. You add the dye to the oil, drive for a day so the dye travels wherever the oil travels, then shine the light around the engine in the evening. The leak path glows. For a careful owner, that one evening of work can pinpoint a valve cover gasket, a drain plug, or a filter seal before any money changes hands. Compare that with $100 to $150 for an hour of professional diagnosis. The shop hour is still worth paying when the glow points somewhere deep or hard to reach, but you arrive knowing what you are paying to fix, and that changes the whole conversation.
Keep notes while you do this. Write down the mileage each time you add oil. A simple list on your phone turns a vague feeling into a rate nobody has to argue with, and a rate that suddenly gets worse deserves faster attention than one that has held steady for a year.
The checking schedule that actually fits Texas driving
For cars past 100,000 miles, turbocharged engines, and any car you already know uses oil, check every other fill-up. Turbos run hot and tend to use more oil by design, and high-mileage seals rarely get tighter with age. For everything else driven hard in Texas heat, once a month is the floor. Add two more checks that catch problems early: before any long trip, without exception, and once right after an oil change, whoever did the change. A shop can underfill, overfill, or fit a filter badly, and a two-minute check in the parking lot finds it while the fix is still free.
Build the habit onto something you already do, and keep the rag and spare quart where you can reach them. Two minutes, in the right order, on a regular rhythm. That is all that stands between normal Texas oil use and the pressure light that arrives too late to help.