The shade matched perfectly under the store lights. By lunch it had turned orange. That story is so common in Texas that it feels like a rite of passage, and it rarely means poor eyesight. Foundation matching fails in three specific places: the undertone gets skipped, the swatch happens in the wrong light and on the wrong spot, and the formula fights the skin and the weather. Fix those three places in order, and shade hunting stops being guesswork.
Work through the steps in sequence. Undertone first, because it rules out most wrong shades at once. Depth second, because the same depth in the wrong undertone still looks like a mask. Testing third, because even the right family of shade needs proof on real skin. Formula last, because a perfect color in a formula that melts, cakes, or clings will still fail by afternoon.
Step 1: Find the undertone before anything else
Surface tone is what shows on the surface: redness, a tan, a pale winter week. Undertone is the steady hue underneath, and it does not change with the season. Foundation has to match the undertone. Get it wrong and the face looks pink, gray, yellow, or orange even when the depth looks close.
Warm undertones lean golden and peachy. Gold jewelry tends to flatter more than silver. The veins on the inner wrist look greenish. Sun often leads to a tan rather than a fast burn. Cool undertones lean pink and rosy. Silver jewelry tends to flatter more. Wrist veins look blue or purple, and sunburn arrives easily.
Neutral undertones sit between the two. Veins look blue-green, both gold and silver look fine, and no single test gives a clean answer. Olive undertones need special care. Olive skin has a greenish cast that is easy to misread as warm because of the yellow in it. That misread is why olive skin so often ends up in foundations that look orange or muddy. A useful check is to hold plain white paper beside a clean face in natural light. Skin that looks yellowish against the paper leans warm, pinkish leans cool, and grayish or greenish suggests neutral or olive.
No single test settles it. Use two or three checks together: veins, jewelry, and the white paper test. Once the undertone family is clear, shop only inside that family. That one filter removes most of the shelf from consideration, which is exactly the point.
Step 2: Pin down depth as a separate choice
Depth is the light-to-deep scale, from fair through light and medium to tan and deep. Depth and undertone are separate axes. A medium warm shade and a medium cool shade share a word on the box and look nothing alike on skin. Names also shift between brands, so a medium in one line can match a tan in another. Never buy by name alone when switching brands.
Most people also have more than one depth across the year. Texas sun sees to that. Even careful sunscreen users often run about a shade deeper in summer than in winter from small daily exposure that adds up. Plan for two shades: a winter shade and a summer shade. Mix them in the in-between months of spring and fall rather than forcing one bottle to cover the whole year.
When a choice sits between two depths, test both before deciding. A shade that runs too light can look ashy and mask-like, especially on deeper skin. A shade a touch deeper often blends more forgivingly at the edges, as long as the undertone is right. Depth errors show most at the jaw, which leads straight to the testing step that catches them.
Step 3: Swatch three shades on the jawline
Hands and wrists are the wrong test site. Their color and sun history differ from the face and neck. The jawline is the right site because the goal lives there: a face and neck that read as one continuous color, with no visible line where makeup ends.
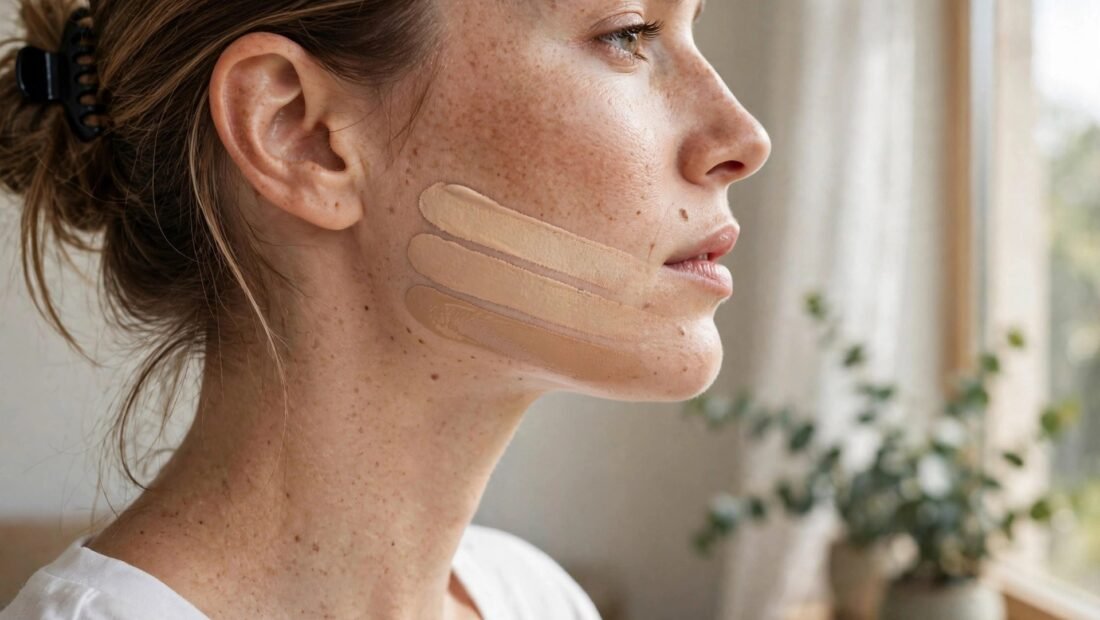
Pick three candidate shades inside the right undertone family, ideally the expected depth plus one lighter and one deeper. Paint them as short stripes along the jaw, crossing slightly onto the neck. Blend only the lower edge of each stripe. Then step into natural daylight. A window works. Stepping outside works better. Store light lies, especially harsh overhead light, which can make a poor match look clean and a good match look dull.
In daylight, the right stripe all but disappears into the skin. If the edge of a stripe stays visible, that shade is wrong, no matter how it looked at the counter. Keep both remaining candidates on for the next step rather than wiping them off and choosing fast.
Step 4: Wait 10 minutes and judge the dry-down
Many formulas oxidize as they dry, reacting with air and skin oils and settling darker or more orange than the wet swatch suggested. Ten minutes is enough time for most of that shift to show. The shade that matched at minute one and turned orange by minute ten just explained, in advance, what would happen by lunch every single day.
Use the wait well. Check the stripes again in daylight, then check them once under indoor light, since most days include both. Ask for samples when a store offers them and wear the finalist for a full day before buying a full bottle when possible. A full day reveals shine, settling, and color shift that no counter test can.
While judging, match to the neck and chest rather than to the face alone. Faces are often redder or more tanned than the neck. A foundation matched only to a red or tanned face can leave a pale neck looking disconnected. The shade that bridges face and neck, or the one that favors the neck when the two differ a lot, almost always looks more natural in photos and in person.
Step 5: Sort out why a shade turns orange
Orange has two main causes, and telling them apart saves money. The first is oxidation, covered above: the right undertone family that still dries darker and warmer. The answer there is a slightly lighter depth, a different formula, or a thin layer of primer between skin and foundation to slow the reaction.
The second cause is an undertone mismatch that was there from the start. A warm shade on cool skin can read orange or sallow. A cool, pink shade on warm or olive skin can read ashy at first and then strangely orange at the edges as it wears. No amount of blending or powder fixes a wrong undertone family. When two or three shades from one family all look off in the same way, the family itself is the problem, and switching undertone beats switching depth.
Olive skin hits this trap most often. Mainstream ranges still serve olive poorly, so look for lines that name olive shades directly. A yellow-based shade adjusted with a tiny amount of green corrector can also work. Test any mix on the jawline with the same daylight and 10-minute rules. Guessing at the bathroom mirror under warm bulbs is how the orange-by-lunch cycle repeats, and it is also part of why your foundation looks cakey by afternoon, since the wrong formula and wrong shade tend to be bought together.
Step 6: Match the formula to Texas skin reality
Color gets a foundation bought. Formula decides whether it survives the day. Texas heat and humidity are hard on makeup for most of the year, and skin type decides which formula stands a chance.
Oily and combination skin in August needs long-wear help. A long-wear matte or natural-matte liquid, oil-free, holds up best, with powder pressed into the T-zone. Dewy and radiant finishes add shine where humidity already provides plenty, and they tend to slide and separate fastest. Dry or mature skin needs the opposite approach. Hydrating, satin formulas sit better, while stiff matte products cling to dry patches and settle into lines, making skin look older and makeup look heavier by midday. A lighter, medium-coverage layer, built only where coverage is needed, beats a full heavy coat for mature skin in any season.
Acne-prone skin does best with non-comedogenic and fragrance-free formulas, and with concealer placed only on spots rather than a thick foundation layer everywhere. Winter in Texas brings its own switch. Dry cold fronts can push even normal skin toward a richer, more hydrating formula for a few months. Keeping the same shade family while changing the finish by season is a normal and sensible adjustment.
Sunscreen needs a clear rule here. SPF printed on a foundation bottle is not enough sunscreen on its own. Nobody applies foundation in the thick, even layer needed to reach the labeled protection, and the American Academy of Dermatology’s skin care guidance treats real sunscreen as the base layer for that reason. Apply sunscreen first, let it set, then apply foundation over it. In Texas sun, that order protects skin while the shade work above protects the match.
Step 7: Do a final daylight check before committing
Before a shade becomes the daily shade, give it one honest full test. Apply it in the morning the way it will actually be worn, over sunscreen and any usual primer. Check it at the jaw in daylight before leaving. Check it again at lunch in different light, and once more late in the day for shine, settling, and color shift.
If the lunch check shows orange, run the Step 5 split: oxidation or wrong family. If the color holds but the finish breaks down, keep the shade and change the formula or the setting routine instead. If the summer face has outgrown the winter bottle, move to the summer shade rather than bronzing a too-light base into submission every morning.
The goal through all seven steps stays plain. The right foundation is the one nobody notices. Undertone first, depth second, jawline stripes in daylight, a 10-minute wait, and a formula chosen for real Texas weather gets there far more reliably than any counter guess under store lights.