
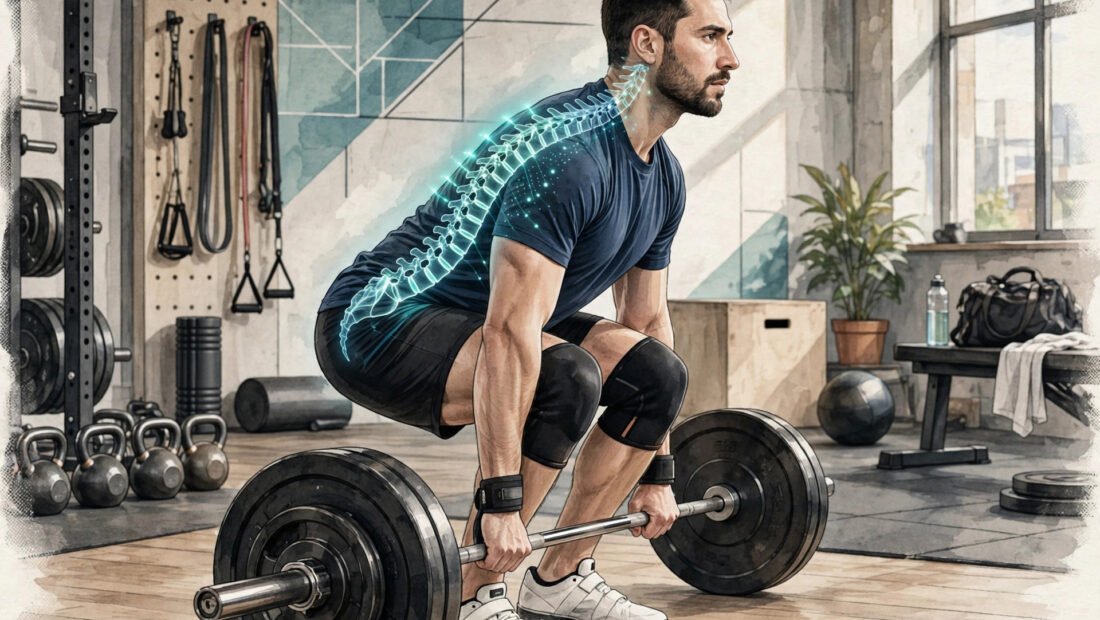
The deadlift is the one lift where the bar starts dead on the floor and the back is the only crane. Nothing moves until the body creates tension and drives the ground away. That simplicity is deceptive. Five setup steps, repeated the same way on every rep, decide whether the lift builds total-body strength or bills the lifter with weeks of back pain. The good news is that those steps are learnable, checkable on video, and safe to practice at light weights while skill catches up.
The deadlift trains the whole back side of the body at once: hamstrings, glutes, back, traps, grip, and core in a single movement. Picking a heavy object off the floor is also the most common real-life strength task. The risk comes not from the lift itself but from loading it before the pattern is solid.
Materials and Setup Before Any Weight
Very little gear is needed at the start. A broomstick or PVC dowel long enough to lie along the spine is the main teaching tool. Flat, hard-soled shoes or bare feet give better balance than thick running shoes, which compress under load. A barbell and plates come later, at a weight light enough to stop any rep mid-movement without strain. A phone propped against a water bottle handles video checks.
Clear a flat area with room on both sides and no traffic behind the lifter. Collars keep plates from sliding. A belt is not on the beginner list. Learning to brace the core without a belt builds the skill that protects the back on every lift. A belt becomes a reasonable tool much later, for heavy loads after form is solid. Anyone with a history of a herniated disc needs medical clearance first, before any deadlift practice.
Form references from the American Council on Exercise’s exercise library describe the same hinge pattern taught below, and comparing personal video against a trusted reference helps catch drift early. The same hinge and bracing ideas carry over to other lifts, including the guidance on proper squat form to protect your knees, where joint tracking and a flat back matter just as much.
Step 0: Learn the Hip Hinge With a Dowel
The deadlift is a hip hinge, not a squat. In a hinge, the hips push back, the knees stay relatively soft, and the torso leans forward as one stiff unit. In a squat, the knees bend deeply and the torso stays more upright. Beginners who squat the deadlift place the hips too low, shift the bar forward, and lose power and safety at once.
Start with the wall drill. Stand about a foot from a wall, facing away from it. Push the hips back until the glutes touch the wall, keeping the knees soft. Step a little farther from the wall as control improves. The drill teaches the hips-back pattern with no weight to hide errors.
Next, use the dowel drill. Hold the dowel along the spine so it touches three points at once: the back of the head, the upper back, and the tailbone. Hinge forward by pushing the hips back while keeping all three points in contact. If the dowel lifts off the tailbone, the lower back is rounding. If it lifts off the head, the neck is craning. Practice in short sets until the hinge feels boring and repeatable. Most people need 1 to 3 sessions at this stage. That time is the highest-value part of learning the lift, and skipping it is the most common beginner shortcut.
Step 1: Set the Feet and the Bar Over Mid-Foot
Stand with the bar over the middle of the feet, about an inch from the shins, with feet roughly hip-width apart and toes turned out slightly. Mid-foot is the balance point. A bar that starts too far forward will swing away from the legs and pull the lifter off balance. A bar that starts jammed against the shins will scrape and force the hips into a poor position. Check this position before bending down. Once the grip is set and the shins come to the bar, the bar should not roll forward or back. This starting spot stays the same on every rep, light or heavy.
Step 2: Grip the Bar Just Outside the Legs
Hinge down and grip the bar just outside the legs. Use a double overhand grip to start, with both palms facing the body. That grip is simple, symmetric, and strong enough for beginner loads. Switch to a mixed grip, with one palm facing away, or to a hook grip only when grip truly becomes the limit and the bar starts slipping despite good effort. Changing grip early to chase heavier weight hides the real limit and adds twist to the lift. Keep the arms straight and think of them as straps connecting the shoulders to the bar. Bent arms waste energy and invite strain.
Step 3: Bring the Shins to the Bar
Bend the knees until the shins touch the bar. Bring the shins to the bar; do not move the bar to the shins. Rolling the bar at this point ruins the mid-foot start from Step 1. As the shins come forward, the hips settle to their natural hinge height, which is usually higher than beginners expect. Forcing the hips lower turns the setup into a squat and sets up the most common fault in the lift: hips shooting up first when the pull begins. Let the shin angle and the dowel-taught hinge decide hip height, not a mental picture of sitting down.
Step 4: Lift the Chest and Flatten the Back
Lift the chest so the logo on a shirt would face the wall ahead. That cue flattens the lower back into a flat or very slightly arched position, never rounded. The head stays neutral, with eyes fixed on a spot about 10 feet ahead on the floor, not up at a mirror. A neutral neck keeps the spine in one line from head to tailbone. Pull the slack out of the bar by getting tight before the lift starts: shoulders set, lats engaged as if bending the bar around the legs, and the bar clicking lightly against the plates as tension builds. A lift that starts from slack will jerk. A lift that starts from tension will move smoothly.
Take a big breath into the belly and brace the core as if expecting a punch. Hold that brace through the hardest part of the rep. Practice it at light weights until the breath, the flat back, and the chest-up position arrive together.
Step 5: Drag the Bar Up and Drive the Floor Away
Stand up by pushing the floor away with the legs while dragging the bar up the shins and thighs in a straight vertical line over mid-foot. The hips and chest should rise together. Keep the bar in contact with the legs; daylight between bar and thighs means the load has drifted forward and the lower back is paying for it. At the top, stand tall and squeeze the glutes hard. Stop at vertical. Leaning back at lockout adds strain with no benefit.
Lower the bar by reversing the pattern. Push the hips back first, then bend the knees once the bar passes them. That order keeps the bar path straight on the way down. For beginners at light weights, the controlled lowering is valuable practice and should stay slow and clean.
Checking Form on Video
Film work sets regularly, at least monthly while learning, from two angles. The side view shows the most: the bar path should stay vertical over mid-foot, the back angle should hold steady as the bar leaves the floor, the lower back should stay flat, and the head should stay neutral with eyes on that spot about 10 feet ahead. If the hips rise much faster than the chest, the weight is too heavy or the hips started too low.
The front or rear view catches a second set of faults. Knees should track over the toes without caving inward. The grip should be even, and the bar should stay level. From behind, the back should look flat and symmetric, with no shift of the hips to one side. Fix one fault at a time.
Correcting the Common Errors
A rounded lower back is the most dangerous error. Usual causes are hips set too low, weight beyond current skill, or weak bracing. The fix combines three moves: raise the hips to the natural hinge position, reduce the weight by 10 to 20 percent, and return to the dowel drill until the flat-back hinge is automatic again. Never grind through rounded-back reps to finish a set. The set ends when the flat back ends.
Hips shooting up first turns the deadlift into a stiff-legged back lift. The legs straighten while the bar barely moves, and the back then has to do the rest alone. Lighter weight, plus the paired cues of chest up and push the floor away, retrains the timing. Bar drifting forward has its own fix: the drag cue, stronger lat engagement, and a fresh check of the mid-foot start. Jerking the bar off the floor comes from starting with slack, so the fix is to pull the slack out and get fully tight before driving. Overextending at the top is fixed by standing tall, squeezing the glutes, and stopping at vertical.
Beginner Progression and Variations
Deadlift once per week as a beginner. The lift taxes the whole body, and skill practice needs fresh legs and a fresh back. A sound starting dose is 3 to 5 sets of 3 to 5 reps at a weight that leaves 2 to 3 good reps in reserve on every set. Grinding the last rep with broken form teaches the broken pattern. Only clean patterns deserve more weight.
Add 5 to 10 pounds per week while form stays perfect. When form breaks at a new weight, stay at that weight until every checkpoint passes on video. Two variations help learning. Romanian deadlifts use lighter loads and drill the hinge. Trap-bar deadlifts allow a more forgiving body position and suit many beginners well. Block pulls shorten the range for those who struggle off the floor. Sumo deadlifts, with a wide stance and hands inside the knees, are also legitimate and suit lifters with long torsos or hip shapes that favor the position. Learn conventional basics first, then test sumo and keep whichever feels strongest and pain-free.




1 Comment